Thursday, April 13, 2006

The Star Charts of Apollo (Part One)

Humans have navigated by the stars, since the dawn of man. Those seemingly stationary pinpoints of light in the night sky provided mariners and aviators the direction home as mankind moved into modern times. It would only be natural to use the stars to determine the proper course of a spacecraft during a voyage into outer space.

Early Earth orbit star charts mimicked the earthbound star charts by having a circular layout with the stars and constellations arranged around the wheel as they would appear in the sky at night. The photograph of an Apollo 9 training star chart is just such an example.

During the Apollo era, stellar navigation was integrated into the digital computer and perfected through the use of a sextant. The diagram below shows how the sextant optical assembly functioned with the DSKY (Digital display and keyboard) to help program the navigation systems and determine the proper course for the Apollo spacecraft. The navigation unit was placed in the lower equipment bay against the wall of the command module for stability and to prevent vibration. The unit consisted of an optical assembly that included the sextant and scanning telescope as well as the DSKY which interfaced with the Apollo Guidance Computer (AGC).

The first major use of the Apollo Guidance Computer came with the flight of Apollo 8. The mission was to journey to the Moon for the first time in the history of mankind. It would also be a test of the MIT designed computer system. The test would be to determine if the Apollo Guidance Computer would be able to navigate the spacecraft to the Moon and back without the help of Earth based guidance assistance.

In the photograph above, taken during the Apollo 8 mission, Jim Lovell is using the scanning telescope to locate a specific star for input into the AGC. Command Module Pilot (CMP) Lovell is sighting through the eyepiece, then he will enter a two digit number that represents the particular star into the AGC via the key pad located in the upper right corner of the photograph. The digital number code for the star would tell the computer one point in space where the spacecraft was located. The triangulation of three star positions would provide an accurate state vector for the Apollo stack that consisted of the command/service module (CSM) and the lunar module (LM). The Apollo 8 mission proved that the spacecraft's navigation computer could be self sufficient on a journey to the Moon.

With the advent of the digital computer that was introduced into the Apollo spacecraft, the star charts changed to accommodate the new system. The star charts were redesigned from the circular chart type to a more rectangular chart. The constellations were aligned on the ellipse. Specific stars were highlighted, named and numbered with a two digit numerical code numbering 1 through 45. If you look closely at the above scan, you will see the stars, their names and numbers on the chart. This star chart from Apollo 10 is an early design that would change to provide ease of use during future missions.

As the missions to the moon progressed, the star charts continued their metamorphosis. Here is a lunar module (LM) chart from the next mission, Apollo 11. Although the grid system is the same, the constellations are heavily outlined and there are no background star fields to confuse the astronauts at key moments. Speed and accuracy were required since the star sightings were usually done during key events like Translunar Insertion (TLI) or Trans Earth Insertion (TEI). This star chart accompanied the crew to Man's first landing on another world.

I caught up with Buzz Aldrin, the Apollo 11 LMP, in New Jersey in 2005. Where I got a photograph with him holding the LM star chart flown on his mission.

This star field chart was for use with the scanning telescope also located at the navigation station inside the command module. This particular page was to show the CMP, Michael Collins, the correct star alignment that he would see through the eyepiece of the scanning telescope. This page showed how the stars should line up to make sure the Apollo CSM was in the right attitude just prior to lighting the Service Propulsion System (SPS) or main engine for TEI. This critical maneuver boosted the crew and their spacecraft out of lunar orbit and back to Earth.

In Part Two of the Star Charts of Apollo, we will show show of the different star charts used in the CSM and LM as well as star charts used on later missions to the Moon.

The Star Charts of Apollo (Part Two)

In part two of the Star Charts of Apollo, we will look at the different charts used in both the command module and the lunar module.


Again one of the first things to understand about the star charts was how they interacted with the spacecraft and it's navigation computer, the Apollo Guidance Computer(AGC) and the inertial measurement unit (IMU) . The above diagram shows the primary components of the system. The astronaut locates the star through the optical assembly. He plugs the two digit star code located on his star chart into the DSKY, which alerts the Apollo Guidance Computer to run a program that updates the inertial measurement unit. Once the operation is complete, then the state vector or position of the spacecraft is known.

The black star chart located above was of a type normally used in the command module (CM). I have only seen one exception to it's use in the CM. The chart is approximately 6 x 15 inches and unlike the other flat rectangular star charts is made of a plastic film. Color was used to differentiate the planets from the star field. The key stars used for navigation are numbered, highlighted and oversized. This black star chart was used as a training aid for the crew of Apollo 15. These black star charts were multi-purpose, they were used for many things including as sunshades in the CM. An Apollo 11 television broadcast on the way to the Moon shows the sunshade use during a tour of the spacecraft. Buzz Aldrin pointed the camera at the window holding the black star chart and comments about it as a sun shade. The black part of chart blocked the sun, but like being in a planetarium, the stars were brillantly illuminated.

One other story is related to the star chart design. Gus Grissom was working with the designers of the star charts for the Apollo Program. During the decision making process of choosing which stars to use on the chart and their number code for use in the Apollo Guidance Computer, Gus Grissom made up the names of three stars for use on the charts. Virgil Ivan Grissom, Edward White II and Roger Chaffee were to be the first Apollo crew to fly in space on Apollo 1. Gus took a section of his name as well as White's and Chaffee's names, spelled them backwards and added them to stars on the star chart initial design for their flight. When the crew of Apollo 1 perished in "The Fire." NASA maintained those star names on the star charts in honor of the fallen crew. If you click on the black star chart and look for star #3, star #20 and star #17, then you find the stars named after the Apollo 1 crew. "Navi" is Grissom's middle name of Ivan. "Dnoces" stands for Ed White, the Second and "Regor" is for Roger Chaffee. A small honor for a heroic crew.

The lunar module also carried a computer called the Primary Navigation and Guidance System (PNGS). The PNGS also used star charts for navigation purposes while on the Moon.
The above diagram shows how the Primary Navigation and Guidance System worked inside the LM. The key components were the LM Guidance Computer, the Alignment Optical Telescope (AOT), the Inertial Measurement Unit, the DSKY and landing radar. The CM and LM used the same guidance computer, but the main difference between the two spacecraft was the optical unit. While the CM sextant and scanning telescope could determine both the spacecraft position and orientation. The AOT could only determine the LM's orientation. The AOT used a three position rotated prizm to cover the lunar sky. The LGC could read the AOT's position and by aiming the eyepiece at different stars in the lunar sky, the LGC could determine the LM's orientation.


The LM carried several checklists or Flight Data Files (FDF) onboard the spacecraft during a lunar mission. One of the FDF's was the G&N (Guidance & Navigation) Dictionary. The G&N Dictionary was the manual and checklist for the operation of the LM PNGS system. After the first few pages of the checklist, there is the star chart for use in the LM. The above star chart flew on Apollo 17 and is part of the complete FDF. The star charts of later missions used a complete grid system over the star field for ease of use.

Also included in the G&N Dictionary FDF along with the star chart is the star key. The star key listed the stars used in the LGC in both alphabetic and numeric order. The star key also flew in the G&N Dictionary with the above star chart.

The DSKY has been discussed, but not shown during this study of the star charts. Here is one of the production models. The numbers would be typed into the guidance computer via the key pad. The numbers would appear in the screen on the right. The astronaut would confirm the number and press enter to input the code into the guidance computer. The computer would process the information to determine the position and/or the orientation of the spacecraft.


The star chart and star key shown above are from the G&N Dictionary that flew on the Apollo 16 lunar mission. Both pieces are signed and certified by Charlie Duke, the Lunar Module Pilot (LMP) aboard the Apollo 16 mission. The dark spots on the chart are traces of lunar dust.

Charlie Duke is pictured with the same star chart shown above. The star chart and star key were part of Charlie's collection.


The above photograph show the AOT and the DSKY at the LM console. Unlike the command module navigation station, the navigation equipment in the LM is located in different areas of the LM console. The AOT is located on the ceiling of the LM at the top of the photograph. The DSKY is located on the console at the bottom of the picture. The guidance computer is located inside the aft wall and the IMU is located in the ceiling in the front of the LM.


The final star chart to be displayed in this series is a circular star chart used to determine the proper orientation of the LM while on the lunar surface. The two piece chart consists of a black base disk with the star field and a semi-transparent disk with circular ring displays on it that are attached to each other by a metal rivet. The circular rings on the transparent disk are actually viewfinder displays showing what stars would appear in the AOT at certain times on the lunar surface during a mission. This star chart was flown on the Apollo 17 mission to the Taurus Littrow region. This star chart was used prior to lift off. The transparent disk section is folded over. Gene Cernan states that he used this chart to orient the ship just prior to launch back into lunar orbit. The fold was done with his gloved hand, so he could align the star chart properly during the events just before lunar surface lift off.

The Apollo 17 LM carried two such star charts. The first chart for use in the event of an emergency abort lift off immediately after the initial landing. The second chart for use during a normal lift off at the end of the mission on the lunar surface. The second chart was used, at that time, due to the fact that the planets and stars had precessed across the sky during the astronauts time of the Moon.

Gene Cernan is pictured with the same star chart shown above. Gene was a guest of Novaspace Galleries and I was able to get the chart certified and photographed during the Burbank show at their booth in 2004. The star chart and star key were part of Gene's collection.

The star charts have universal aura about them. They are beautiful, elegant artifacts of the space age and easily understood by the layperson here on Earth. At the same time, they were precise instruments used by the astronauts as part of the Apollo guidance system to navigate their way to and from the Moon.

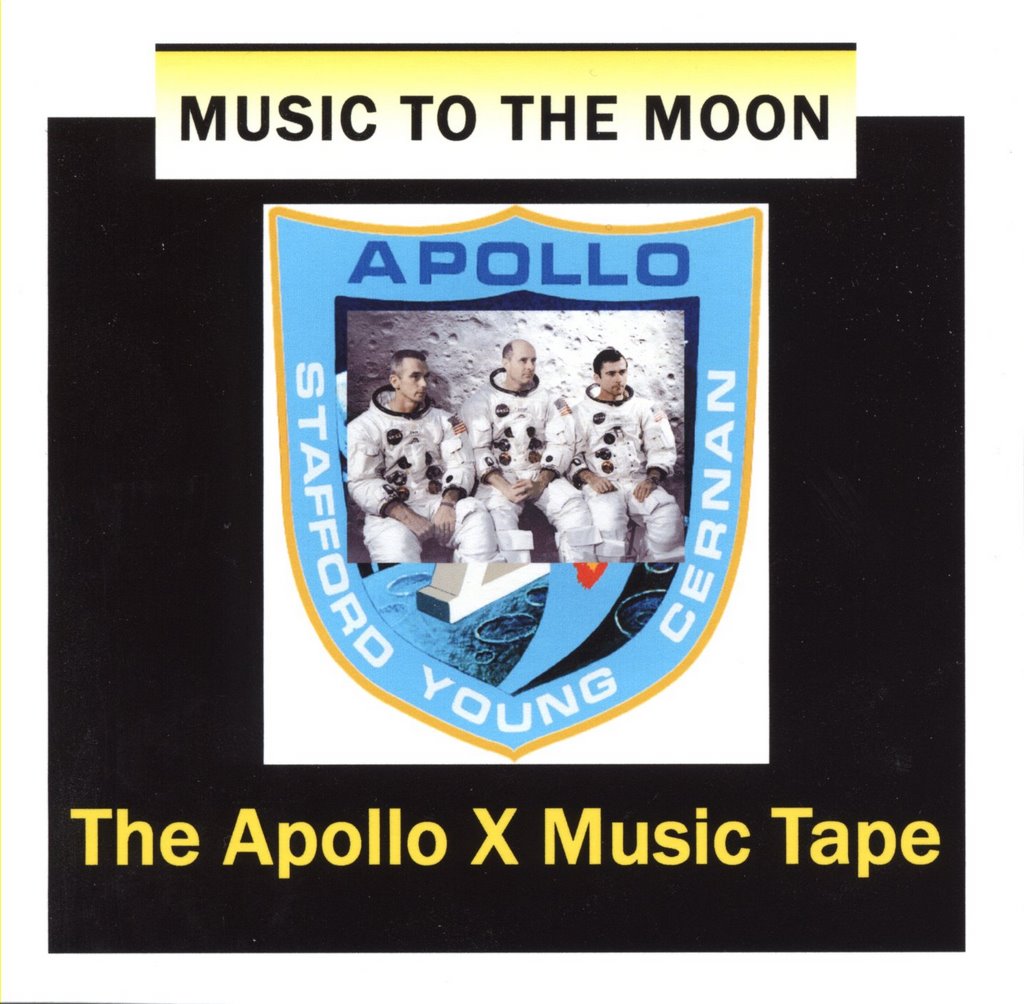
Music to the Moon: The Apollo X Music Tape

On May 18, 1969, Tom Stafford, John Young and Gene Cernan lifted out from Pad 39B of the Kennedy Space Center launch complex. Their next stop was the Moon. Their mission was the final "dress rehearsal" for the Saturn V, the Apollo spacecraft and the lunar module at the Moon prior to landing.

The trip to lunar orbit would take three days of coasting in deep space. Although the crew remained busy during the translunar coast phase of their mission, there were down times between chores. The crew had a special piece of home in the form of popular music of the time recorded onto a cassette tape by a friend to occupy them during such lulls in the flight.

The cassette tape was recorded by Al Bishop, who was an employee of Boeing at the time. Al hooked a cassette tape player to his stereo and recorded several of the more popular musical artists of the day. Artists like Frank Sinatra, Dean Martin and The Kingston Trio were included on the tape. Mr. Bishop used songs like "Fly Me to the Moon", "Going Back to Houston" and "Moonlight Serenade" to provide a theme befitting a flight to the Moon. Gene had pretty good taste for the popular music of the time.

When the crew returned from the mission, they designed and had constructed a presentation plaque with the actual music cassette. Tom, John and Gene presented it to Al Bishop as gift of gratitude from providing them with some entertainment during their trip to the Moon. When Mr. Bishop passed away, his widow gave it back to Gene Cernan. Gene kept it in his collection for a number of years before parting with it himself.

In the photograph shown above, Gene is displaying the tape presentation while at his home in Texas.


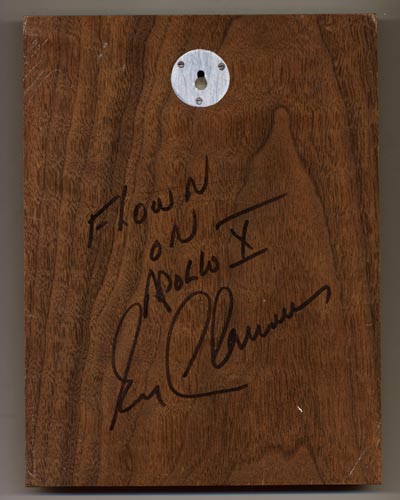
Gene wrote a brief certification "Flown on Apollo X" on the reverse side of the presentation plaque. He signed the plaque using Eugene A. Cernan. Which indicates that Gene signed the artifact when he first started identifying his collection as he only uses Gene Cernan now. I learned that from Gene in December of 2005 during our visit together in Tucson.

In August of 2006, Gene told me that he and Al Bishop spent the afternoon lying on the floor of Al's living room recording all the music on this tape. The quality of the tape reflects that type of early private recording with miscues, skips and clicks that an older record album would make on a turntable. That is what makes the tape so good for historic purposes. These two men took the time to sit, choose and record music for a flight to the Moon.

I was able to gently open the display and extract the tape from the display. After 37 years, the tape still functioned. The music was downloaded into my computer. A compact disk was burned of the music and presented to Gene for his listening pleasure.


Every once in a while I put on my copy of the CD and listen to Frank Sinatra sing "Fly me to the Moon" and know that in this particular case the song really did journey to the Moon.

There is a new development as of 5-19-2005. There are three clarinet instrumentals towards the middle of the album. The songs and arrangements were familar, but I could not remember the musician at the time. I have since found out that the clarinet player, composer and arranger of those melodies was a gentleman by the name of Acker Bilk. He lives in England and stills tours. I contacted him via his website (www.ackersmusicagency.co.uk/acker.html) and told him the story of his music going to the Moon. Mr. Bilk was requested a copy of the CD. During my meeting with Gene in the summer of 2006, I pointed out that I had found Mr. Bilk. Gene remembered his music and his hit single "Stranger on the shore." It is always interesting to find connections to artifacts.

Paul Weitz's Skylab I Rotational Hand Controller

On May 25, 1972, a Saturn 1B lifted off from Pad 39 at the Kennedy Space Center. The launch signified a new era in manned space flight. The Apollo spacecraft carried three men, Pete Conrad, Paul Weitz and Joe Kerwin to a rendezvous with America's first space station, Skylab. They would become the first men to fly a long term mission in space.


In order to rendezvous with Skylab, the crew had to use their Rotational Hand Controller (RHC) to maneuver the Apollo Command Module into the proper attitude for docking. The photograph shown above is one of the hand controllers that was needed to accomplish the rendezvous and docking. The RHC shown above was under the command of Skylab I Pilot, Paul Weitz.


As highlighted in the photograph above, the rotational hand controllers were located next to the commander and the pilot of the spacecraft.

The above diagram shows the complete RHC assembly and the degrees of freedom on each axis. A movement of the wrist was all that was required to move the spacecraft along the three different axes. The diagram and working knowledge of the RHC was provided courtesy of John Fongheiser at Historic Space Systems (www.space1.com).


This side view of the RHC shows the mike activation button (black color) located on the hand grip of the controller. A movement of the index finger would activate the microphone located in the crewman's helmet.


The scan shows the actual ASHUR report listing the removal of the Skylab 1/SL-2 (Skylab II) Rotational Hand Controllers after the mission for crew evaluation. The crew was later presented with the RHC's as a memento of their mission to America's first manned space station.


Paul Weitz, who served as Skylab One's pilot, poses with the Rotational Hand Controller presentation that was given to him by NASA after the completion of his flight in 1973.


As a side note, it appears that the RHC's were custom fitted as shown above. The test RHC is signed by Gene Cernan and is from his collection. It is a plaster casted piece used in the test designs for the controller.